
Sacred Heart Rose Kombucha -From first brew to flavoring stage
Why I and everyone in my world is absolutely in love with my homemade rose kombucha…
1. Homemade satisfaction
For me, making kombucha myself ensures that I get to enjoythe highest quality of the ingredients used. My family, dear friends & precious body to have the best!
2. Save Money
A bottle of this delectable brew at the store runs anywhere from $4 to $9! Make your own for pennies on the dollar
3. Did I mention rose?!
I am obsessed with rose as a both a therapeutic & highly spiritual ingredient for all my DIY creations, especially my food! It can soothe stress, inflammation & enhance digestion.
NOTE: this is a two week process depending upon the weather & ambient temperature for the booch to ferment. I know, its hard to be patient but once you start this pattern initially then you will have an endless cycle of batches to be flavored and then enjoyed while the next brew is fermenting over time.
Also with time more and more SCOBY babies will bud off your first mama SCOBY, so then you can brew multiple batches at the same time! Before you know it you will have a SCOBY hotel you grew yourself full of extras to share with friends.
Click HERE to learn how to grow your very own SCOBY mother
Supplies:
3 gallon glass container (I use 4 of these Anchor glass containers)
Glass measuring cup
Kettle to boil water
Large wooden spoon to stir
Bottling supplies: 12 quart Mason jars OR a dozen Bormioli 34 oz Rocci pop top bottles (how many you use at a time depends upon how much booch you have brewed)
Over time I have collected a ton of mason jars and lock or pop top bottles, either purchasing them or recycling. You can load up all at once or stockpile over time 🙂
PArt 1 -Brewing your first kombucha (can be up to a 2 week process)
This ingredients list is for ONE batch, so however many batches you want to make please increase to match. I usually do 4 batches at a time and thus multiply everything here by 4 :). Each SCOBY makes 1 batch.
Ingredients
*Kombucha SCOBY Don’t have one yet? No problemo. Click HERE to learn how to grow your very own SCOBY from scratch! So satisfying!
*1 gal distilled water at room temperature
*2 cups boiling water
*6 organic black tea bags
*1 cup organic cane sugar
Directions:
Start boiling 2 cups of water
Rinse out your glass container to make sure it is free of dust or any particles which could contaminate your lovely brew
Place 6 teabags into the glass container
Pour boiling water over tea and let steep for 3 minutes
Squeeze teabags carefully with tongs to get every last bit of yummy tea tannins out for your kombucha, the SCOBY mother will love this! She feeds on it 🙂
Add your sugar & stir with wooden spoon until totally dissolved
Add gallon of room temperature distilled water to cool down your brew instantly
Test the temperature with your finger to be sure it is cool or room temp, then add your SCOBY mama
Cover top of container with 2 layers of paper towel and then a tea towel to prevent any contamination
Mark the date and label your brew so you know when to bottle
Place your container with booch brew into dark and warm area where it will be protected from bright or direct light to allow the fermentation process.
Note: This process usually takes 2 weeks. During hot weather it can be less time, so be sure to check your brew after a week. Give it a taste test. You will know its ready to flavor by taste.
In colder climates you may need a warming mat or it will be too cold for the SCOBY to ferment the sugars and tea. HERE are some suggestions.
Tips: If the brew smells like vinegar the SCOBY mother needs more sugar to turn the brew into the booch flavor you know and l love. Add 1/2 cup of sugar and check back in 3 days to taste test.
Trust yourself! Use your tastebuds to determine when the batch is ready to be bottled. Only you know your taste and how you like it. Have fun with the process. You will be an old pro before you know it!


2nd Bottling or the Flavoring Stage
This recipe covers a 2 week period from initial booch brew to second bottling when you get to flavor your brew
2nd Bottling or flavoring stage -My favorite part!!!
(after kombucha has sufficiently fermented)
Supplies & Ingredients:
*12 Quart Mason jars, or 12 Bormioli 34 oz Rocco pop top bottles
* Glass measuring cup or easy pour glass vessel to transfer the brew from large container to bottles or jars
*1 tsp organic cane sugar per bottle for final feeding & flavor profile
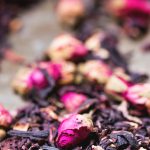
*1 tsp organic dehydrated rose petal powder per bottle (adds an insanely gorgeous vibrant color and flavor to the beverage)
* 8 to 11 organic dried rosebuds per bottle
*2 -3 TBS organic Rose water concentrate or 4 drops organic solvent-free rose essential oil per bottle
Directions:
Prepare a good amount of counter space to fit all these large jars and supplies on your counter
Make sure your sink is empty -you will use it to bottle to make sure no sticky booch gets all over your kitchen!
First, rinse all your bottles and jars to make sure they are fresh. Pour out any remaining water from the rinse
Gather your kombucha brews from their hiding spot and place on counter, removing paper towels and towel covering (can re-use for next batch)
Place a large glass measuring cup into your sink and carefully, slowly pour your kombucha from the large glass container into the measuring cup
Carefully pour 1 tsp of sugar into the bottom of your jars or bottles. I do 2 to 3 at a time and pour as I go to make sure I only fill enough vessels to match the amount of kombucha prepared
Pour your rose water into the jars or bottles, again only 2 or 3 at a time
Add your rosebuds
Fill your jars or bottles up and leave about 1.5 to 2 inches of room for the fermentation process to breathe, also leaves room to shake brew once sealed after first flavoring and then periodically while it is fermenting for a few days
Shake vigorously once sealed. Label with the date made, and set into your dark warm spot
This flavor stage process should take 2 to 3 days to ferment a bit more to get the flavor just right before placing in the fridge which will pause all fermentation.
MAKE SURE to check and taste test your brew after 2 days to keep an eye on it. A word of caution: over the peak of summer this year I forgot to pop the tops and after 2 days one of the bottles LOUDLY exploded in our pantry and made a GIANT sticky booch mess all over everything!! At 11pm :/
Fermentation is a powerful process so be sure to check all jars and bottles after 2 days make sure too much pressure does not build up while you wait for it to be perfect for your taste. Nurture your brew by opening to relieve pressure and then giving them a shake once sealed up again for the culture to blend well and digest the added sugar and flavors.
Once the flavors to your liking, put all the bottles and jars into your fridge, which will halt the fermentation process. The kombucha will be good for months one refrigerated!
With quality organic ingredients and homebrewed probiotics, this is a lovely and healthy treat to share with everyone. Everyone loves the vivid pink color and rose buds floating in their glasses. My daughter and her friends love it! I bring bottles to my community workshops and people freak out. Enjoy with friends and family on a picnic in the outdoors.
I love rose so much as a spiritual food that I even made a rose chocolate as a heart and soul food. For more details visit my gourmet chocolate site here
Let me know how the rose touches your life for the better <3
Love,
M.